Create Invitee List
The Create Invitee List routine allows the user to create a list of people who will be invited to a particular Marketing Event. Invitees can be selected according to Clients, Bill Entities, Timekeepers, or from invitee lists from previous Marketing Events. The Marketing Events for which the user is selecting invitees are as entered and maintained through the Marketing routine. Once an invitee list has been created, it can be maintained through the Manage Invitees routine.
When the Create Invitee List routine is accessed from the eQuinox main menu, the screen shown below will be displayed.
Field Definition
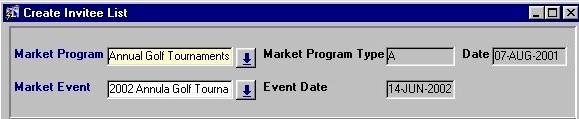
Market Program - The Marketing Program associated with the Marketing Event for which the user is creating an invitee list. A selection may be made from the List of Values provided. The Marketing Programs that appear in the list are as entered and maintained through the Marketing routine.
Market Event - The Marketing Event for which the user is creating an invitee list. A selection may be made from the List of Values provided. The list will display all Marketing Events associated with the Marketing Program selected in the previous field. The Marketing Events that appear in the list are as entered and maintained through the Marketing routine.
Market Program Type - The type of Marketing Program, as specified in the Marketing routine. Valid options are "A" - Ad Hoc, or "D" - Defined. This value displays automatically, based on the selection made in the Market Program field.
Event Date - The date on which the Marketing Event is scheduled to take place, as specified in the Marketing routine. This value displays automatically, based on the selection made in Market Event field.
Date - The current system date.

Select Invitees From - In the Select Invitees From section, the user must select an option by which to select persons that will be added to the invitee list.
Filter Invitees By Clients
When the user selects the Clients option, the Filter By Clients screen seen below appears. In this screen, the user can enter filtering criteria to specify the type of Client they wish to include or exclude from the list. To include all Clients and their contacts in the list, the user can leave the fields on this screen blank and then click the Create List for Clients button.
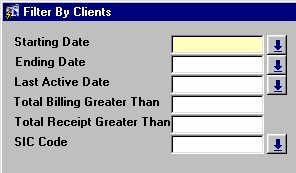
Starting Date, Ending Date - To include Clients in the list with a specific starting or ending date, the user must enter the dates here. For example, to include only those Clients who came to the Firm after a certain date, the user must enter that date in the Starting Date field. A selection may be made from the Calendar provided.
Last Active Date - To include in the list only those Clients that have been last active within a specified time range, the user must enter that date here. For example, to include only those Clients who have been last active within the past month, the user must enter a date from last month in this field. A selection may be made from the Calendar provided.
Total Billing Greater Than - To include in the list only those Clients that to date have been billed more than a specified dollar amount, the user must enter that amount here. For example, to include only those Clients who have been billed more than $1000.00, the user must enter that amount in this field.
Total Receipt Greater Than - To include in the list only those Clients that to date have paid to the Firm more than a specified dollar amount (i.e. for bills), the user must enter that amount here. For example, to include only those Clients who have paid more than $1000.00, the user must enter that amount in this field.
SIC Code - To include in the list only those Clients that have a specific Standard Industrial Classification (SIC), the user must enter that SIC Code here. A selection may be made from the List of Values provided.
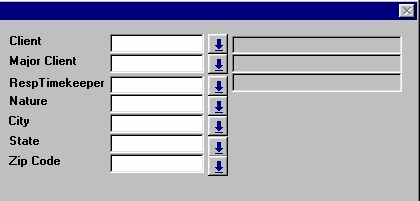
Client - To include in the list only those contacts associated with a specific Client, the user must enter that Client here. A selection may be made from the List of Values provided. The Client's unique identifier and name will be displayed.
Major Client - To include in the list only those contacts associated with a specific Major Client, the user must enter that Major Client here. A selection may be made from the List of Values provided. The Major Client's unique identifier and name will be displayed.
Resp Timekeeper - To include in the list only those Clients associated with a specific Responsible Timekeeper, the user must enter that Timekeeper here. A selection may be made from the List of Values provided. The Timekeeper's unique identifier and name will be displayed.
Nature - To include in the list only those Clients associated with a specific Nature of Practice (i.e. a specific type of Matter), the user must enter that Nature here. A selection may be made from the List of Values provided.
City, Province, Postal Code - To include in the list only those Clients whose address includes a specific City, Province, or Postal Code the user must enter that address information here. A selection may be made from the List of Values provided in each of the three fields.
![]()
Once the user has entered all the necessary filtering criteria, they can click the Create List for Clients button to create a list of all Clients and their associated contacts that fit the criteria entered. The List of Clients with Contacts screen will appear, displaying the list.
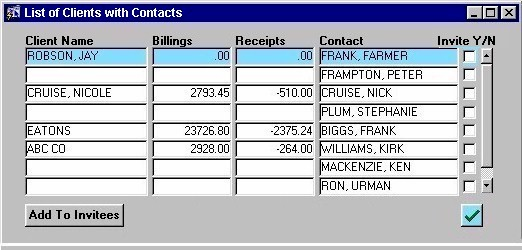
Client Name - The names of the Clients that fit the filtering criteria entered in the Filter by Clients screen.
Billings - The total dollar amount that each Client has been Billed to date.
Receipts - The total dollar amount that each Client has paid to the Firm to date (i.e. for Bills).
Contact - The names of the Contacts associated with each Client.
Invite Y/N - To select a Contact to be included in the invitee list, the user must 'check' the check box field for that record. To include all Contacts that are currently displayed, the user can click the "green check mark" button, which will automatically select all records. To complete the process, the user must then click the Add to Invitees button; at this point, all selected Contacts will be included in the invitee list, and the user can return to the main screen.
Filter Invitees By Bill Entity
When the user selects the Bill Entity option, the Filter By Bill Entity screen seen below appears. In this screen, the user can enter filtering criteria to specify the type of Bill Entity they wish to include or exclude from the list. To include all Bill Entities and their contacts in the list, the user can leave the fields on this screen blank and then click the Create List for Bill Entities button.
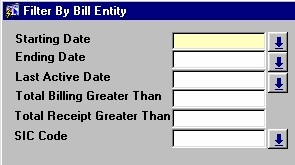
Starting Date, Ending Date - To include Bill Entities in the list with a specific starting or ending date, the user must enter the dates here. For example, to include only those Bill Entities who came to the Firm after a certain date, the user must enter that date in the Starting Date field. A selection may be made from the Calendar provided.
Last Active Date - To include in the list only those Bill Entities that have been last active within a specified time range, the user must enter that date here. For example, to include only those Bill Entities who have been last active within the past month, the user must a date from last month in this field. A selection may be made from the Calendar provided.
Total Billing Greater Than - To include in the list only those Bill Entities that to date have been billed more than a specified dollar amount, the user must enter that amount here. For example, to include only those Bill Entities who have been billed more than $1000.00, the user must enter that amount in this field.
Total Receipt Greater Than - To include in the list only those Bill Entities that to date have paid to the Firm more than a specified dollar amount (i.e. for bills), the user must enter that amount here. For example, to include only those Bill Entities who have paid more than $1000.00, the user must enter that amount in this field.
SIC Code - To include in the list only those Bill Entities that have a specific Standard Industrial Classification (SIC), the user must enter that SIC Code here. A selection may be made from the List of Values provided.
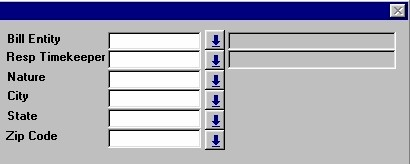
Bill Entity - To include in the list only those contacts associated with a specific Bill Entity, the user must enter that Bill Entity here. A selection may be made from the List of Values provided. The Bill Entity's unique identifier and name will be displayed.
Resp Timekeeper - To include in the list only those Bill Entities associated with a specific Responsible Timekeeper, the user must enter that Timekeeper here. A selection may be made from the List of Values provided. The Timekeeper's unique identifier and name will be displayed.
Nature - To include in the list only those Bill Entities associated with a specific Nature of Practice (i.e. a specific type of Matter), the user must enter that Nature here. A selection may be made from the List of Values provided.
City, Province, Postal Code - To include in the list only those Bill Entities whose address includes a specific City, Province, or Postal Code the user must enter that address information here. A selection may be made from the List of Values provided in each of the three fields.

Once the user has entered all the necessary filtering criteria, they can click the Create List for Bill Entities button to create a list of all Bill Entities and their associated contacts that fit the criteria entered. The List of Bill Entities with Contacts screen will appear, displaying the list.
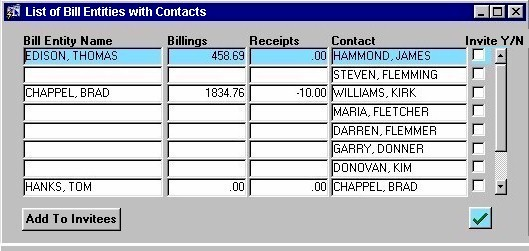
Bill Entity Name - The names of the Bill Entities that fit the filtering criteria entered in the Filter by Bill Entity screen.
Billings - The total dollar amount that each Bill Entity has been Billed to date.
Receipts - The total dollar amount that each Bill Entity has paid to the Firm to date (i.e. for Bills).
Contact - The names of the Contacts associated with each Bill Entity.
To select a Contact to be included in the invitee list, the user must 'check' the check box field for that record. To include all Contacts that are currently displayed, the user can click the "green check mark" button, which will automatically select all records. To complete the process, the user must then click the Add to Invitees button; at this point, all selected Contacts will be included to the invitee list, and the user can return to the main screen.
Filter Invitees By Timekeeper
When the user selects the Timekeeper option, the Filter By Timekeeper screen seen below appears. In this screen, the user can enter filtering criteria to specify the type of Timekeeper they wish to include or exclude from the list. To include all Timekeepers and their contacts in the list, the user can leave the fields on this screen blank and then click the Create List for Timekeepers button.
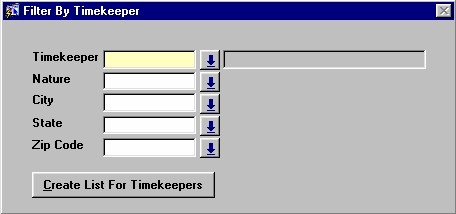
Timekeeper - To include in the list only those contacts associated with a specific Timekeeper, the user must enter that Timekeeper here. A selection may be made from the List of Values provided. The Timekeeper's unique identifier and name will be displayed.
Nature - To include in the list only those Timekeepers associated with a specific Nature of Practice (i.e. a specific type of Matter or Law), the user must enter that Nature here. A selection may be made from the List of Values provided.
City, Province, Postal Code - To include in the list only those Timekeepers whose address includes a specific City, Province, or Postal Code the user must enter that address information here. A selection may be made from the List of Values provided in each of the three fields.
Once the user has entered all the necessary filtering criteria, they can click the Create List for Timekeepers button to create a list of all Timekeepers and their associated contacts that fit the criteria entered. The List of Timekeepers with Contacts screen will appear, displaying the list.
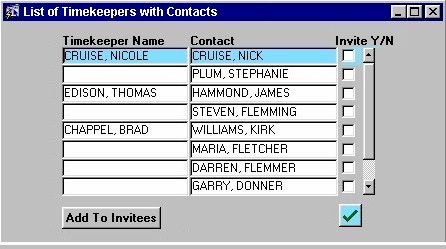
Timekeeper Name - The names of the Timekeepers that fit the filtering criteria entered in the Filter by Timekeeper screen.
Contact - The names of the Contacts associated with each Timekeeper.
Invite Y/N - To select a Contact to be included in the invitee list, the user must 'check' the check box field for that record. To include all Contacts that are currently displayed, the user can click the "green check mark" button, which will automatically select all records. To complete the process, the user must then click the Add to Invitees button; at this point, all selected Contacts will be included to the invitee list, and the user can return to the main screen.
Filter Invitees By Previous Events
When the user selects the Previous Event option, the fields seen below appear. This allows the user to select which Event they are selecting invitees from.

Market Event - The Marketing Event from which the user is selecting invitees. A selection may be made from the List of Values provided.
Once the user has selected an Event, they must then click the Add to List button. The List of Previous Invitees screen will then appear, displaying the invitee list from the selected Marketing Event.
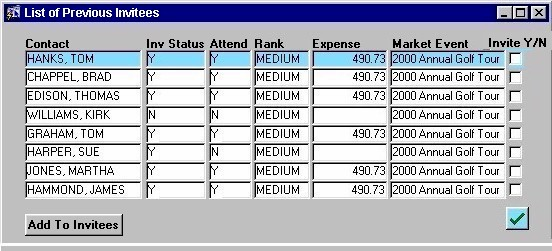
Contact - The names of the contacts (invitees) that were on the invitee list for the selected Marketing Event.
Inv Status - Indicates whether or not the current contact was actually issued an invitation. Valid options are "Y" (Yes), and "N" ( No).
Attend - Indicates whether or not the current contact attended the Event. Valid options are "Y" (Yes), and "N" (No).
Rank - The attendance rank for the current contact (i.e. the importance of their attendance). Valid options are "HIGH", "MEDIUM", and "LOW".
Expense - If the expense for the Event was allocated to the attendees, the dollar amount displayed in this field is the amount allocated to the current contact.
Market Event - The name of the Marketing Event, as selected in the Market Event field above.
Invite Y/N - To select a Contact to be included in the invitee list, the user must 'check' the check box field for that record. To include all Contacts that are currently displayed, the user can click the "green check mark" button, which will automatically select all records. To complete the process, the user must then click the Add to Invitees button; at this point, all selected Contacts will be included to the invitee list, and the user can return to the main screen.